Setting up OpenClaw on Windows 11 is simpler than most guides suggest. Windows 11 includes a native PowerShell installer - one command, follow the wizard, and your AI agent is live.
This guide walks you through every step - installer, AI provider, messaging channel, and security. Prefer to skip local setup? Ampere.sh handles everything with no configuration required.
Before You Start: Security Advisory
OpenClaw is powerful but experimental software. Read this before installing:
Use a Dedicated Machine
Ideally install on a VPS, VM, or dedicated device - not your main personal PC with sensitive data.
Don't Run as Admin
Run the installer as a standard user, not as Administrator, to limit what the process can access.
Vet Community Skills
Only install skills from trusted sources. Community plugins can contain malware - scan with Cisco Skill Scanner before installing.
Bind to Localhost
In openclaw.json, change your gateway setting from 0.0.0.0 to 127.0.0.1 to prevent external access.
Windows 11 Setup Requirements
The native Windows 11 installer is lightweight. Here's what you need before running it:
| Component | Requirement |
|---|---|
| OS | Windows 11 (Home, Pro, or Enterprise) |
| RAM | 4 GB minimum (8 GB recommended) |
| Storage | 2 GB free space |
| PowerShell | Built into Windows 11 (no extra install needed) |
| Internet | Stable connection for installer download and AI API calls |
| AI API Key | Funded account from Anthropic, OpenAI, Gemini, or MiniMax |
How to Set Up OpenClaw on Windows 11
Step 1: Open Windows Terminal or PowerShell
Windows 11 includes Windows Terminal pre-installed - the best way to run commands. Open it from the Start menu or press Win + X → Windows Terminal.
You don't need to run it as Administrator for the installer. A standard user session works.
Step 2: Run the Native Windows Installer
OpenClaw has a dedicated Windows PowerShell installer. Paste this single command and press Enter:
iwr -useb https://openclaw.ai/install.ps1 | iexThe installer will download and launch automatically. When it asks about the security advisory - read it. Select "Yes, I understand" to continue.
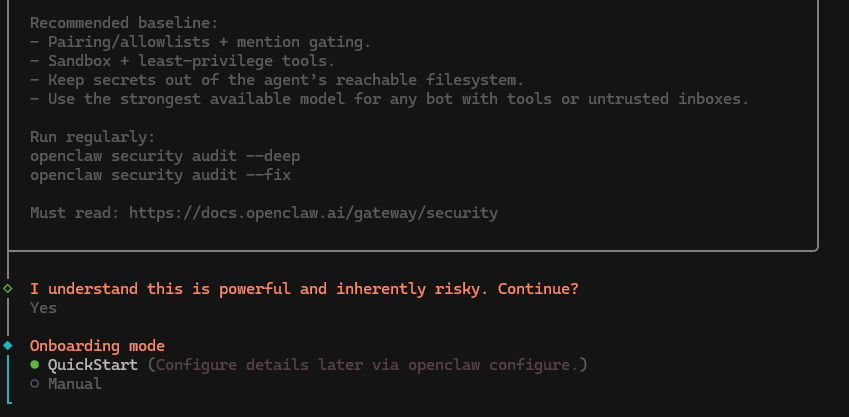
The OpenClaw installer - select "Yes, I understand" then choose QuickStart
Step 3: Select QuickStart
The installer will present installation options. Select QuickStart - this sets up safe, sensible defaults and is the recommended option for most users.
You can fine-tune configuration after you have a working setup. Don't overthink it at this stage.
Step 4: Choose Your AI Provider & API Key
Select your preferred AI provider from the list. Here's a quick breakdown to help you decide:
| Provider | Best For | Cost |
|---|---|---|
| Anthropic (Claude) | Best overall functionality | Pay-as-you-go |
| OpenAI (GPT) | Vision tasks, broad compatibility | Pay-as-you-go |
| Google Gemini | Low cost, fast responses | Free tier available |
| MiniMax | Budget-friendly option | Very low cost |
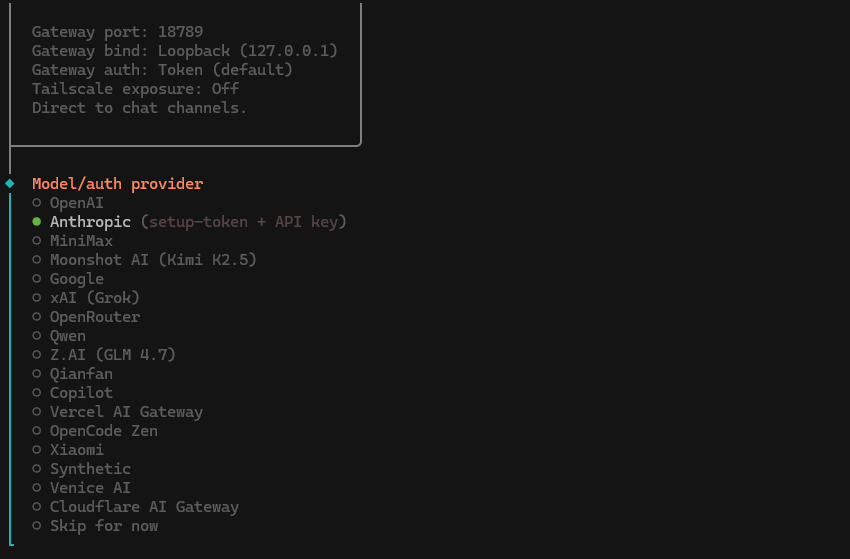
Select your AI provider - Anthropic is recommended for best functionality
Once you've chosen a provider, create and fund your API key, then paste it into the terminal when prompted.
Recommended model selection:
Don't pick the most powerful model as your default (e.g., Claude Opus) unless you need it - the cost adds up fast. Claude Sonnet or Gemini Flash are the sweet spot for most users: fast, capable, and affordable.
Step 5: Complete the Installation
The installer will handle the rest automatically. When asked about skills, you can select No for now - you can always install skills later once your agent is running.
When prompted about bash shell completion, we recommend enabling it - it makes running OpenClaw commands significantly faster by auto-completing as you type.
Select npm as your preferred node manager and continue with defaults until the installer finishes.
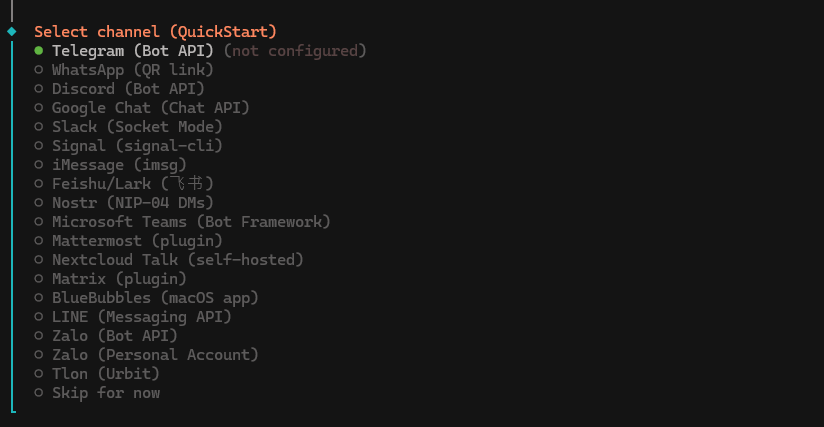
Select your messaging channel - Telegram is selected by default in QuickStart mode
Connect Your Messaging Channel
The installer will ask you to select a messaging channel - this is how you interact with your OpenClaw agent. Here are the two most popular options:
Option A: Telegram
- Open Telegram and search for @BotFather
- Send
/newbot, enter a name for your bot - Copy the token BotFather gives you
- Paste it into the OpenClaw terminal when prompted
- Open Telegram, find your new bot, and start chatting
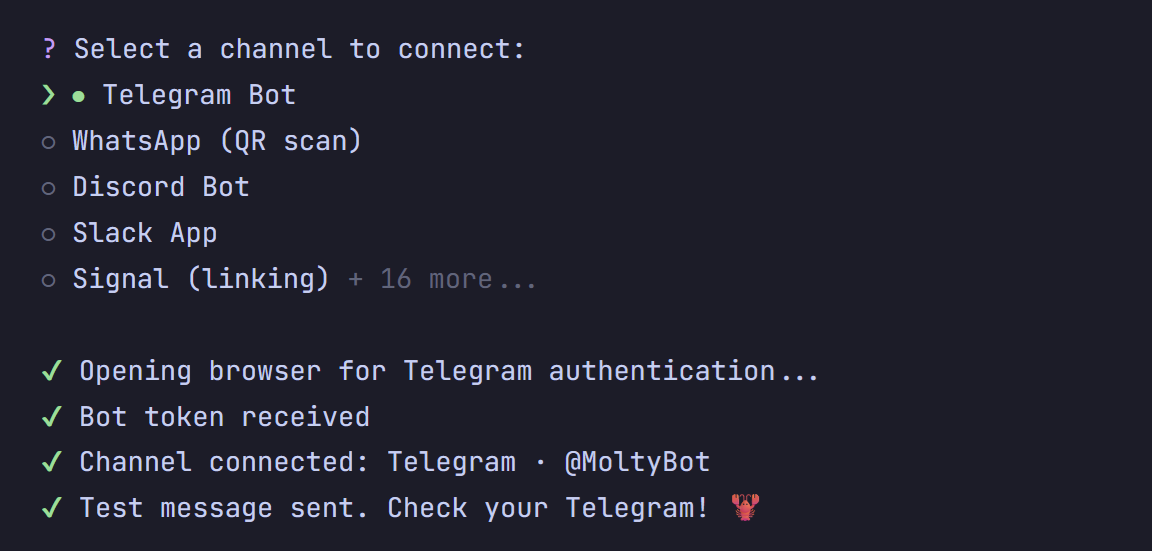
Telegram Bot selected - channel connected and test message sent successfully
Option B: WhatsApp
- Select WhatsApp as your channel in the installer
- Choose "Display QR code" when prompted
- Open WhatsApp on your phone → Settings → QR code icon → Scan code
- Scan the QR code shown in your terminal
- Enter your phone number if prompted, and the connection is complete
Once connected, send a message to your bot. OpenClaw will respond - your AI agent is live on Windows 11. You can also connect to Discord if that's your preferred platform.
Performance Tips for OpenClaw on Windows 11
Pick the Right Model
Don't default to the most powerful model. Claude Sonnet or Gemini Flash handle most tasks well and cost a fraction of Opus or GPT-4o.
Enable Shell Completion
If you skipped it during setup, enable bash shell completion - it auto-completes commands and speeds up your workflow significantly.
Install Skills Gradually
Start with a lean setup. Only install skills you actually need - each one adds to the agent's context and can slow responses if overdone.
Keep Windows 11 Updated
Windows 11 updates include Node.js compatibility improvements and security patches relevant to OpenClaw's runtime environment.
How to Keep OpenClaw Running 24/7 on Windows 11
By default, OpenClaw stops when you close your terminal. Here are two reliable ways to keep it running continuously on Windows 11 - even after reboots.
Option 1: Windows Task Scheduler (Built-In)
Task Scheduler is built into Windows 11 and requires no extra installs. It can auto-start OpenClaw every time your PC boots.
- Press
Win + S→ search Task Scheduler → open it - Click Create Basic Task in the right panel
- Name it "OpenClaw Gateway" → click Next
- Set trigger to "When the computer starts" → Next
- Action: "Start a program" → Browse to your Node.js executable
- In the Arguments field, enter:
# Add this in Task Scheduler → Arguments field
openclaw gateway start
Check "Run whether user is logged on or not" and "Run with highest privileges" for reliable background execution.
Option 2: PM2 Process Manager (Recommended)
PM2 is a lightweight process manager that keeps Node.js apps alive, auto-restarts on crashes, and generates startup scripts. It's the most reliable way to run OpenClaw 24/7.
# Install PM2 globally
npm install -g pm2

# Start OpenClaw with PM2
pm2 start "openclaw gateway start" --name openclaw

# Save the process list
pm2 save

# Generate Windows startup script (auto-start on boot)
pm2 startup
After running pm2 startup, PM2 will output a command - copy and run it in your terminal to register the startup script. From now on, OpenClaw will start automatically on every reboot.
Useful PM2 commands to manage your agent:
# Check agent status
pm2 status

# View live logs
pm2 logs openclaw

# Restart the agent
pm2 restart openclaw

# Stop the agent
pm2 stop openclaw
Don't want to manage this yourself?
Ampere.sh runs OpenClaw 24/7 in the cloud - no Task Scheduler, no PM2, no configuration. Your agent stays online even when your Windows 11 PC is off.