If you're a Windows user who prefers the Linux terminal experience, OpenClaw runs natively on WSL (Windows Subsystem for Linux) - no dual-boot, no VM overhead. One WSL command, install Node.js, run the Linux installer, and your AI agent is live.
This guide covers everything from enabling WSL to configuring your AI provider and connecting a messaging channel. Want to skip local setup entirely? Ampere.sh handles it all - no terminal needed.
WSL vs Native Windows Installer - Which Should You Choose?
Both approaches work. Here's a quick comparison to help you decide:
| Feature | WSL (Linux on Windows) | Native PowerShell |
|---|---|---|
| Installer | Linux curl script | PowerShell iwr script |
| Setup complexity | Medium (enable WSL + install Node.js first) | Low (one command) |
| Filesystem speed | Faster (native ext4) | Standard (NTFS) |
| Linux tools available | Yes (apt, systemd, cron, etc.) | No |
| Background daemon | systemd or PM2 | Task Scheduler or PM2 |
| Best for | Developers familiar with Linux | Users who prefer GUI/PowerShell |
TL;DR: If you're comfortable with a Linux terminal, WSL gives you a faster, more flexible setup. If you want the quickest path, use the native Windows 11 installer instead.
WSL Setup Requirements
Before you start, make sure your Windows PC meets these requirements:
| Component | Requirement |
|---|---|
| Windows Version | Windows 10 (Build 19041+) or Windows 11 |
| RAM | 4 GB minimum (8 GB recommended for WSL2) |
| Storage | 4 GB free (WSL distro + Node.js + OpenClaw) |
| Virtualization | Must be enabled in BIOS (required for WSL2) |
| Internet | Stable connection for downloads and AI API calls |
| AI API Key | Funded account from Anthropic, OpenAI, Gemini, or MiniMax |
How to Install OpenClaw on WSL
Step 1: Enable and Install WSL
Open PowerShell as Administrator (right-click → Run as administrator) and run:
wsl --installThis single command enables the Virtual Machine Platform, installs WSL2, and downloads Ubuntu as the default Linux distribution. Restart your PC when prompted.
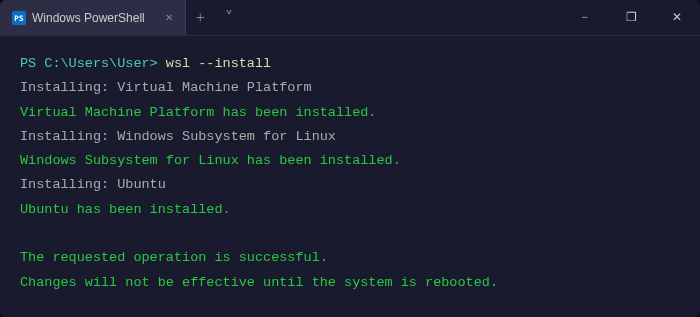
WSL installing - Virtual Machine Platform, WSL, and Ubuntu all set up with one command
If you already have WSL installed but want WSL2, upgrade with:
wsl --set-default-version 2Step 2: Set Up Your Linux User
After restarting, Ubuntu will launch automatically and ask you to create a UNIX username and password. This is your Linux user inside WSL - it doesn't need to match your Windows username.
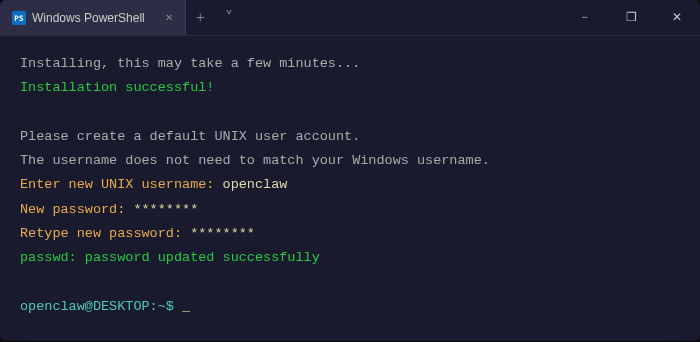
Create your Linux username and password - this is your WSL user for OpenClaw
Important: Don't install OpenClaw as root. Use your standard user account for better security. Read the OpenClaw security guide for full hardening steps.
Step 3: Install Node.js 22+ Inside WSL
OpenClaw requires Node.js 22 LTS (22.16+) or Node 24 (recommended). Install it inside your WSL terminal:
# Add NodeSource repository for Node.js 22
curl -fsSL https://deb.nodesource.com/setup_22.x | sudo -E bash -

# Install Node.js
sudo apt-get install -y nodejs

# Verify installation
node --version
npm --version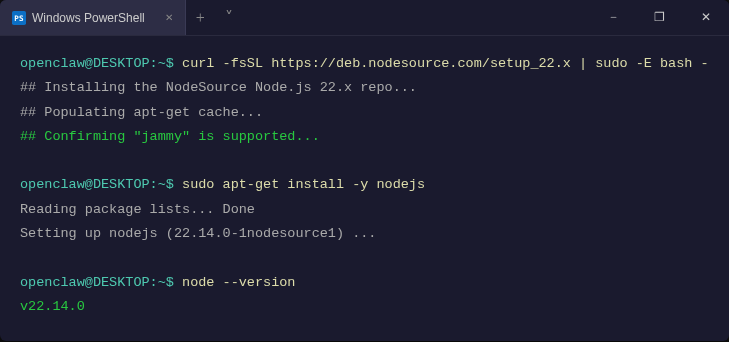
Node.js 22 installed inside WSL - ready for OpenClaw
You should see v22.x.x or higher. If you see an older version, remove it with sudo apt-get remove nodejs and repeat the steps above.
Step 4: Run the OpenClaw Linux Installer
Now install OpenClaw using the same Linux installer that macOS and Linux users run:
curl -fsSL https://openclaw.ai/install.sh | bashThe installer will display a security advisory - read it carefully. Select "Yes, I understand" to continue, then choose QuickStart for safe defaults.
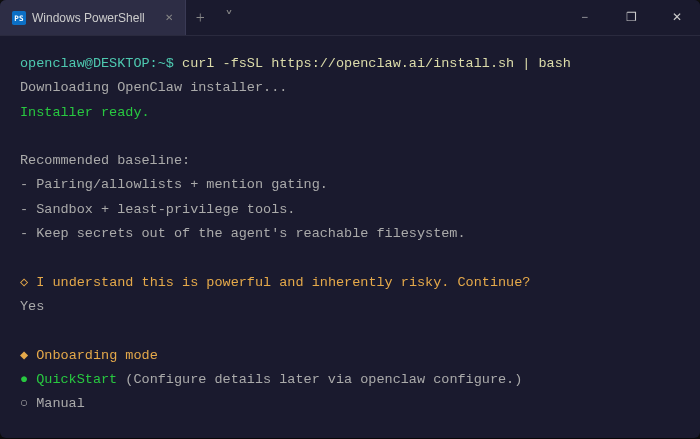
OpenClaw installer in WSL - select QuickStart for recommended defaults
Step 5: Choose Your AI Provider & API Key
The installer will present a list of AI providers. Here's a quick comparison:
| Provider | Best For | Cost |
|---|---|---|
| Anthropic (Claude) | Best overall agent functionality | Pay-as-you-go |
| OpenAI (GPT) | Vision tasks, broad compatibility | Pay-as-you-go |
| Google Gemini | Low cost, fast responses | Free tier available |
| MiniMax | Budget-friendly alternative | Very low cost |
Create your API key on the provider's platform, fund it, and paste it into the terminal when prompted.
Model cost tip:
Don't default to the most expensive model (e.g., Claude Opus). Claude Sonnet or Gemini Flash handle most tasks well at a fraction of the cost.
Step 6: Complete the Installation
When asked about skills, select No for now - you can always install skills later. Enable bash shell completion when prompted - it auto-completes OpenClaw commands as you type.
Select npm as your node manager, continue with defaults, and the installer will finish setting up your agent.
# After installation, verify OpenClaw is working
openclaw gateway status

# Start the gateway
openclaw gateway start
You should see the gateway running on port 18789. Open http://localhost:18789 in your Windows browser to access the dashboard.
What You Can Do with OpenClaw on WSL
Once your agent is running, you interact with it over Telegram, WhatsApp, or Discord - just like chatting with a person. Here's what Windows + WSL users commonly use it for:
File & Folder Management
"Find all PDFs in my Downloads folder and move them to Documents" - your agent runs the Linux command, done in seconds.
Code Assistant
"Review this Python file and suggest improvements" - paste code directly in chat, get a response with fixes and explanations.
Web Research & Summaries
"Summarize the top 5 articles about AI agents this week" - the agent browses, reads, and reports back, all from your WSL terminal.
Scheduled Automation
Combine with cron inside WSL to run tasks on a schedule - daily reports, backup reminders, or automated data processing without lifting a finger.
Git & GitHub Workflows
"Create a branch, commit my changes, and open a PR" - your agent runs the git commands in WSL directly, hands-free.
System Monitoring
"Is my server up? What's disk usage?" - run health checks on your WSL environment and get plain-English answers over chat.
What to Do After Your OpenClaw Agent Is Running
Most tutorials stop at "your agent is running." Here's what to set up next to get real value out of OpenClaw on WSL:
Open the Dashboard in Your Windows Browser
WSL2 shares localhost with Windows. Once the gateway is running, open your Windows browser and go to:
http://localhost:18789You'll see the OpenClaw Control UI - chat sessions, config, logs, and agent status. No extra setup needed.
Set Up VS Code with WSL Extension
If you're a developer, install the WSL extension for VS Code. It lets you edit OpenClaw config files, view logs, and manage your agent directly from VS Code - with full IntelliSense inside WSL.
# Open your OpenClaw config in VS Code from WSL
code ~/.openclaw/openclaw.json
Add More Skills via ClawHub
Skills extend what your agent can do. Install them from ClawHub with one command:
# List available skills
openclaw skills list

# Install a skill (example: web browsing)
openclaw skills install web-browse
Automate Tasks with WSL Cron
WSL2 supports cron jobs natively. Set tasks to run on schedule - daily summaries, file cleanups, or automated reports. Learn more about scheduling AI agent tasks with cron:
# Edit your crontab
crontab -e

# Example: run an OpenClaw task every day at 8am
0 8 * * * openclaw run "Send me today's weather summary"
Common Issues and How to Fix Them
Before you spend 30 minutes debugging, check these first - they resolve most problems users run into:
WSL won't start - "0x80370102" error
Hardware virtualization is disabled in BIOS. Enter BIOS on restart (F2, Del, or F10) and enable Intel VT-x or AMD-V. Save and reboot.
"openclaw: command not found"
The shell hasn't picked up the new PATH. Run:
source ~/.bashrcIf that doesn't work, close your WSL terminal completely and reopen it.
npm install fails with "EACCES: permission denied"
npm is trying to write to a root-owned directory. Fix it by pointing npm to a user-owned folder:
mkdir -p ~/.npm-global
npm config set prefix '~/.npm-global'
echo 'export PATH=~/.npm-global/bin:$PATH' >> ~/.bashrc
source ~/.bashrc
"Invalid API key" error on startup
Your key was mistyped or the account has no credits. Reconfigure it with:
openclaw configureCheck your provider's dashboard to confirm the key is active and funded.
WSL using too much RAM
Create a .wslconfig file in your Windows user folder (C:\Users\YourName\.wslconfig) to cap memory:
[wsl2]
memory=4GB
processors=2
Restart WSL with wsl --shutdown then relaunch for the changes to take effect.