Linux gives you full control over how OpenClaw runs - but that comes with things to configure. This guide keeps it practical: what you need, the exact steps from the official docs, and what to do when something doesn't work.
Prefer a hosted setup with none of the server work? Ampere.sh is a managed option that reduces setup and maintenance - no server configuration required.
Linux Requirements for OpenClaw
| Distro | Ubuntu 20.04+, Debian 10+, Fedora 36+, CentOS/RHEL 8+ (most modern 64-bit distributions) |
| Architecture | x86_64 or ARM64 - Raspberry Pi 64-bit is supported |
| RAM | 1GB minimum - 2GB or more recommended |
| Node.js | Node 22 LTS (22.16+) minimum - Node 24 recommended |
| curl | Required to run the install script - pre-installed on most distros |
| Access | sudo privileges needed for the service install step |
| API Key | Anthropic, OpenAI, or any supported AI provider key |
Installing OpenClaw on Linux Step by Step
Step 1 - Connect to Your Server
If you're running OpenClaw on a VPS, connect via SSH first. Replace your-server-ip with your actual server IP address:
ssh root@your-server-ipIf you're installing on a local Linux machine, skip this step and open a terminal directly.
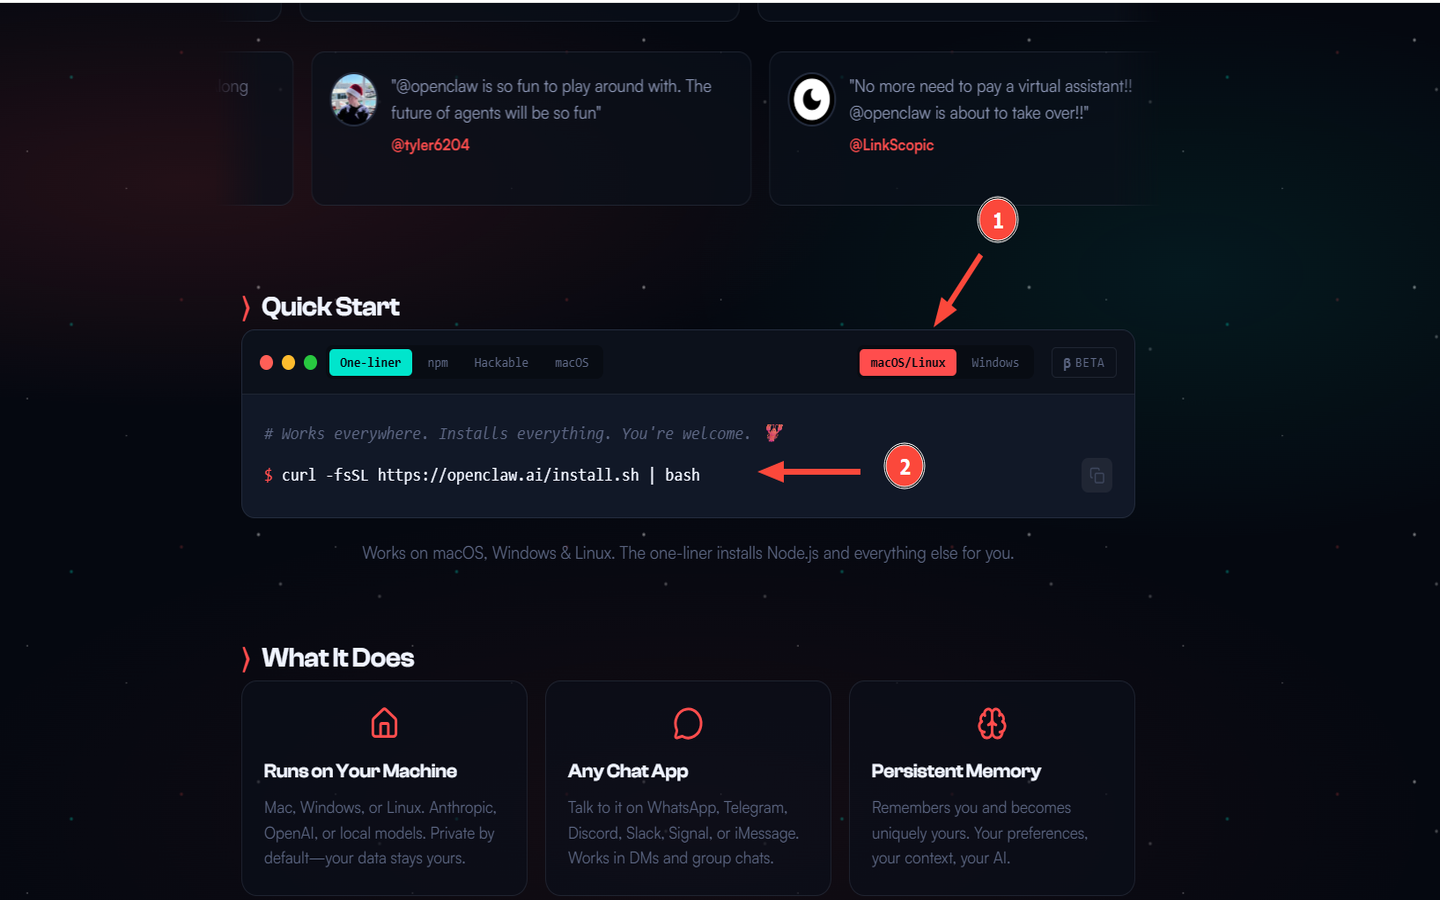
Step 2 - Run the Official OpenClaw Install Script
Run the official install script from openclaw.ai. It handles everything automatically:
curl -fsSL https://openclaw.ai/install.sh | bashThe script will:
- Detect your OS and architecture
- Update the local package index
- Install prerequisite packages (git, curl, gnupg, ca-certificates)
- Install Node.js if it's missing or outdated
- Install the OpenClaw binary
If curl isn't installed yet, run sudo apt install curl (Debian/Ubuntu) or sudo dnf install curl (Fedora/CentOS) first.
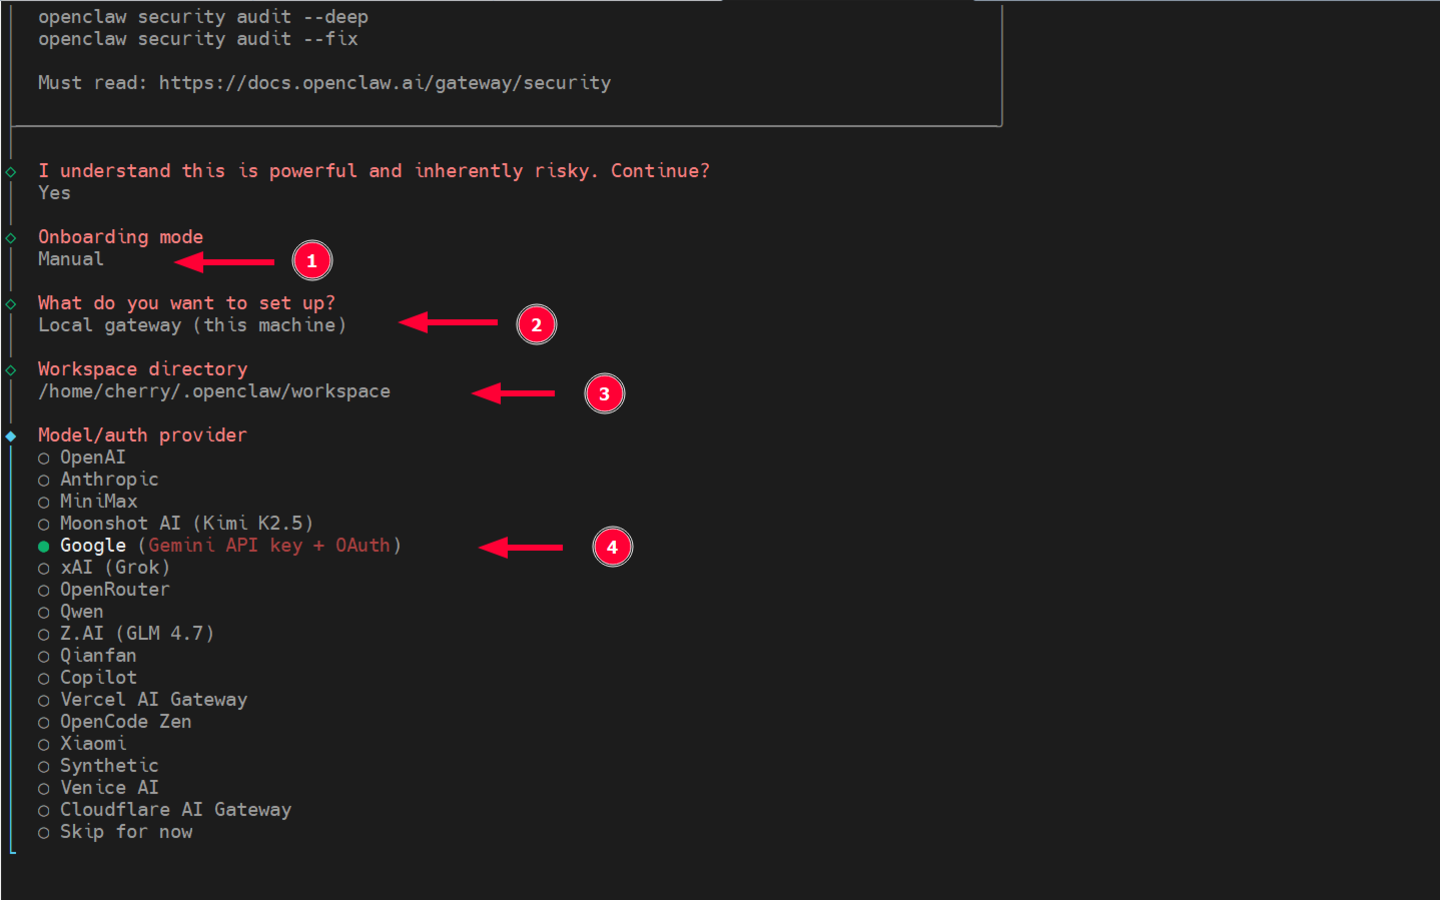
Step 3 - Run Onboarding
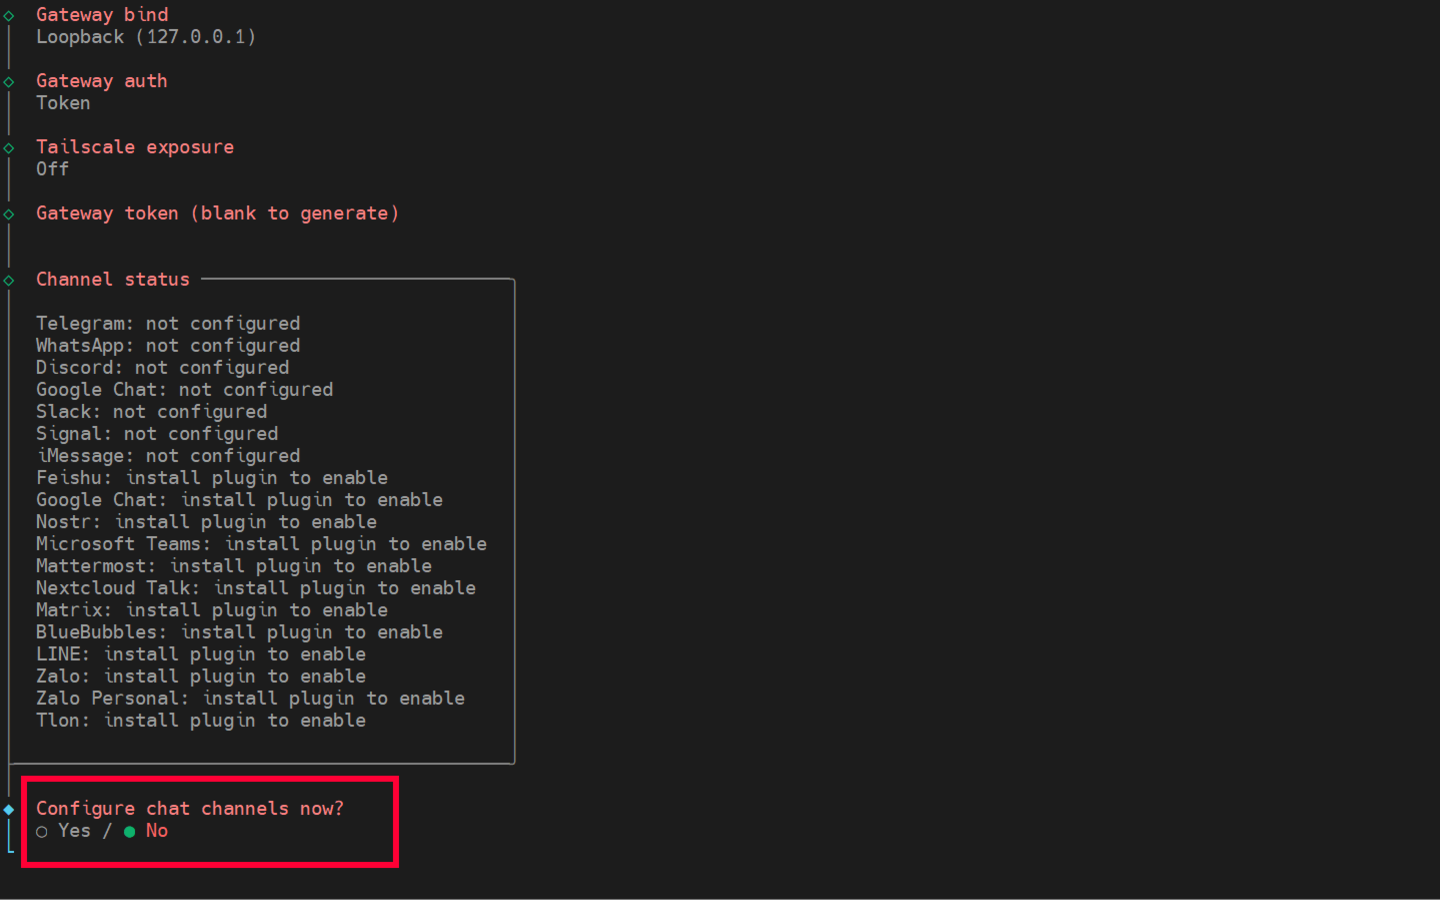
Onboarding walks you through configuring your API key, gateway settings, and optional channels. The --install-daemon flag registers OpenClaw as a background service that starts automatically on every boot:
openclaw onboard --install-daemonDuring onboarding you will be asked to:
- Accept the usage disclaimer
- Choose onboarding mode (select Manual for full control)
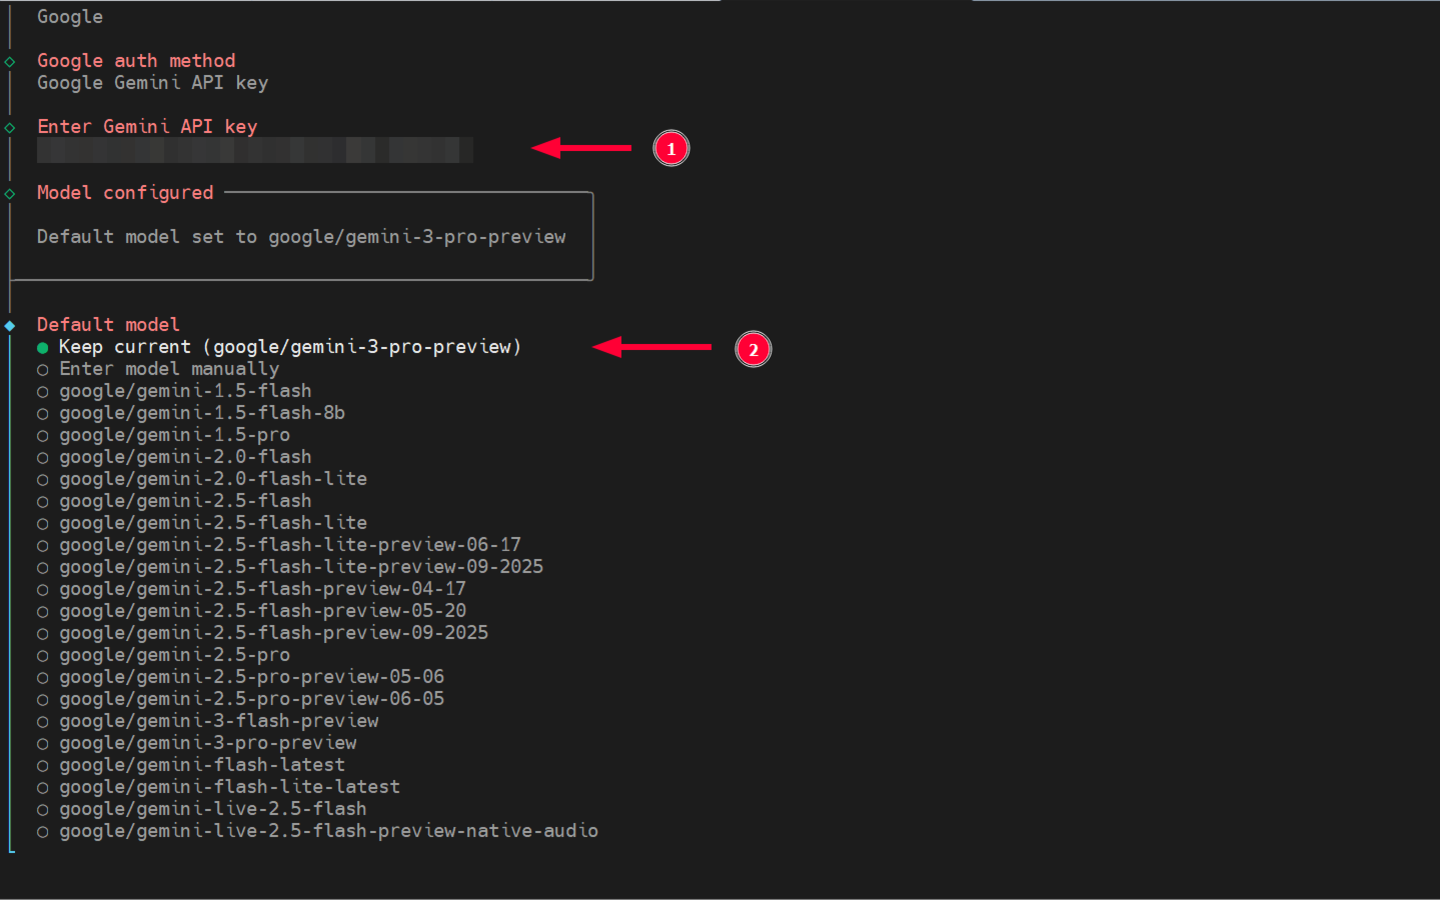
- Set your preferred AI provider and paste your API key
- Set the Gateway port (default: 18789) and bind address
- Optionally connect a messaging channel (Discord, Telegram, WhatsApp)
Step 4 - Check the Gateway Status
If you installed the service in the previous step, it should already be running:
openclaw gateway status
Step 5 - Open the Control UI
openclaw dashboardOr open http://127.0.0.1:18789/ in your browser. If it loads, your Gateway is working. On a headless server, make sure port 18789 is accessible before connecting remotely. Do not expose the dashboard publicly without proper access controls.
Step 6 - Check Your Config (Optional)
cat ~/.openclaw/openclaw.json   # view current config
nano ~/.openclaw/openclaw.json  # edit if needed
Common OpenClaw Linux Errors and How to Fix Them
openclaw: command not found right after install
The binary installed correctly, but your current shell session still has the old PATH cached. Linux doesn't reload shell config automatically - it only picks up changes when you open a new session or manually source your config file.
Run one of the commands below based on your shell, then try again. If it still fails, add the export line to your shell config file permanently.
source ~/.bashrc          # bash
source ~/.zshrc           # zsh
export PATH="$(npm prefix -g)/bin:$PATH"  # if still not found
Agent stops running when you close the SSH session
If OpenClaw was started manually in the terminal, it runs as a child process tied to your current session. When you log out or the SSH connection drops, the process is killed along with it.
Register OpenClaw as a background service using the daemon flag. Once installed, it runs independently of any terminal session and restarts automatically on reboot.
openclaw onboard --install-daemonError: Invalid API key
The key stored in your config doesn't match what your AI provider expects. Keys get invalidated when rotated on the provider side, entered with extra whitespace, or regenerated after a security change.
Open the config file, replace the API key with a fresh one from your provider dashboard, then check the gateway status.
nano ~/.openclaw/openclaw.json
openclaw gateway status
Something is broken but no clear error message
Linux setups can fail silently - a misconfigured setting, a missing step in onboarding, or a service that started but isn't actually responding. The terminal often gives you nothing useful to go on.
Run the built-in diagnostic tool. It checks your config, validates your API connection, and tells you exactly what's wrong.
openclaw doctorRun OpenClaw Without Managing a Linux Server
Local setup works well if you're comfortable managing a Linux environment. But if you just want OpenClaw running without dealing with installation, services, or server maintenance - there's a simpler option.
Ampere.sh is a managed hosting option for OpenClaw:
- No server required - Ampere.sh handles the infrastructure
- Free to start - no credit card required
- Connect to Discord, Telegram, or WhatsApp after setup
- Reduces the operational overhead of self-hosting