Running OpenClaw on Azure allows you to host your AI agent on secure Microsoft cloud infrastructure instead of your local machine.
This means your OpenClaw agent can run 24/7, scale easily, and stay online even when your computer is turned off.
Azure is one of the best platforms for running OpenClaw because it provides:
- Secure infrastructure
- Always-on runtime
- Scalable resources
- Enterprise-ready deployment
- Remote access from anywhere
In this guide, you will learn how to deploy OpenClaw on Azure Linux VM with secure defaults.
OpenClaw on Azure Requirements
| Component | Requirement | Recommended |
|---|---|---|
| CPU | 2 vCPU | 4-8 vCPU |
| RAM | 4 GB | 8-16 GB |
| Storage | 30 GB SSD | 64-128 GB SSD |
| Operating System | Ubuntu 22.04 | Ubuntu 24.04 LTS |
| Network | Stable Internet | High-Speed Internet |
| Azure VM Type | B2s / B1ms | B2as v2 / D4s v3 |
How to Deploy OpenClaw on Azure (Step-by-Step)
Step 1: Install Azure CLI
First, install Azure CLI.
Linux
curl -sL https://aka.ms/InstallAzureCLIDeb | sudo bashmacOS
brew update && brew install azure-cliWindows - Download Azure CLI installer from Microsoft website.
Step 2: Sign In to Azure CLI
Login to Azure:
az login
az extension add -n ssh
The ssh extension is required for Azure Bastion native SSH tunneling. Register the required Azure resource providers (one-time only):
az provider register --namespace Microsoft.Compute
az provider register --namespace Microsoft.Network
Verify both show Registered before continuing:
az provider show --namespace Microsoft.Compute --query registrationState -o tsv
az provider show --namespace Microsoft.Network --query registrationState -o tsv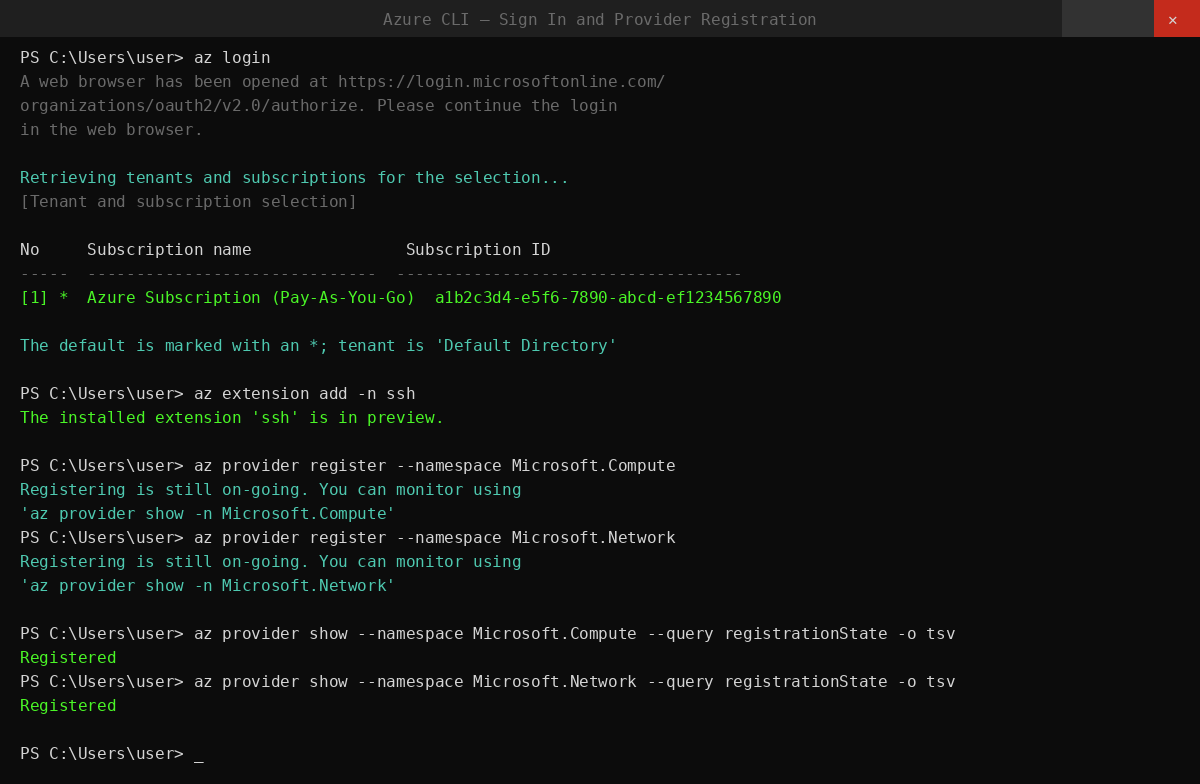
Step 3: Set Deployment Variables
Run these in your terminal to set all variables used throughout this guide:
RG="rg-openclaw"
LOCATION="westus2"
VNET_NAME="vnet-openclaw"
VNET_PREFIX="10.40.0.0/16"
VM_SUBNET_NAME="snet-openclaw-vm"
VM_SUBNET_PREFIX="10.40.2.0/24"
BASTION_SUBNET_PREFIX="10.40.1.0/26"
NSG_NAME="nsg-openclaw-vm"
VM_NAME="vm-openclaw"
ADMIN_USERNAME="openclaw"
BASTION_NAME="bas-openclaw"
BASTION_PIP_NAME="pip-openclaw-bastion"
VM_SIZE="Standard_B2as_v2"
OS_DISK_SIZE_GB=64
Change LOCATION to the Azure region closest to you. The Bastion subnet must be at least /26.
Step 4: Set Up Your SSH Key
Use an existing key if you have one:
SSH_PUB_KEY="$(cat ~/.ssh/id_ed25519.pub)"If you don't have an SSH key yet, generate one:
ssh-keygen -t ed25519 -a 100 -f ~/.ssh/id_ed25519 -C "you@example.com"
SSH_PUB_KEY="$(cat ~/.ssh/id_ed25519.pub)"
Step 5: Create the Resource Group
All Azure resources for this setup will live in one resource group:
az group create -n "${RG}" -l "${LOCATION}"Step 6: Create the Network Security Group
The NSG locks down SSH so only Azure Bastion can reach the VM. Direct internet SSH is blocked:
az network nsg create \
  -g "${RG}" -n "${NSG_NAME}" -l "${LOCATION}"

# Allow SSH from Bastion subnet only
az network nsg rule create \
  -g "${RG}" --nsg-name "${NSG_NAME}" \
  -n AllowSshFromBastionSubnet --priority 100 \
  --access Allow --direction Inbound --protocol Tcp \
  --source-address-prefixes "${BASTION_SUBNET_PREFIX}" \
  --destination-port-ranges 22

# Block SSH from the public internet
az network nsg rule create \
  -g "${RG}" --nsg-name "${NSG_NAME}" \
  -n DenyInternetSsh --priority 110 \
  --access Deny --direction Inbound --protocol Tcp \
  --source-address-prefixes Internet \
  --destination-port-ranges 22

# Block SSH from other VNet sources
az network nsg rule create \
  -g "${RG}" --nsg-name "${NSG_NAME}" \
  -n DenyVnetSsh --priority 120 \
  --access Deny --direction Inbound --protocol Tcp \
  --source-address-prefixes VirtualNetwork \
  --destination-port-ranges 22
Rules run lowest priority number first - Bastion is allowed at 100, everything else is blocked at 110 and 120.
Azure networking, NSG rules, and Bastion setup can be complex for beginners. If you'd prefer to avoid manual configuration, Ampere.sh provides a fully managed OpenClaw deployment.
Step 7: Create the VNet and Subnets
Create the virtual network with the VM subnet, attach the NSG, then add the Bastion subnet:
az network vnet create \
  -g "${RG}" -n "${VNET_NAME}" -l "${LOCATION}" \
  --address-prefixes "${VNET_PREFIX}" \
  --subnet-name "${VM_SUBNET_NAME}" \
  --subnet-prefixes "${VM_SUBNET_PREFIX}"

# Attach NSG to VM subnet
az network vnet subnet update \
  -g "${RG}" --vnet-name "${VNET_NAME}" \
  -n "${VM_SUBNET_NAME}" --nsg "${NSG_NAME}"

# Azure Bastion requires this exact subnet name
az network vnet subnet create \
  -g "${RG}" --vnet-name "${VNET_NAME}" \
  -n AzureBastionSubnet \
  --address-prefixes "${BASTION_SUBNET_PREFIX}"
Step 8: Create the Virtual Machine
az vm create \
  -g "${RG}" -n "${VM_NAME}" -l "${LOCATION}" \
  --image "Canonical:ubuntu-24_04-lts:server:latest" \
  --size "${VM_SIZE}" \
  --os-disk-size-gb "${OS_DISK_SIZE_GB}" \
  --storage-sku StandardSSD_LRS \
  --admin-username "${ADMIN_USERNAME}" \
  --ssh-key-values "${SSH_PUB_KEY}" \
  --vnet-name "${VNET_NAME}" \
  --subnet "${VM_SUBNET_NAME}" \
  --public-ip-address "" \
  --nsg ""
This creates a secure VM without public IP.
Step 9: Deploy Azure Bastion
Bastion Standard SKU with tunneling is required to use az network bastion ssh from the CLI:
az network public-ip create \
  -g "${RG}" -n "${BASTION_PIP_NAME}" -l "${LOCATION}" \
  --sku Standard --allocation-method Static

az network bastion create \
  -g "${RG}" -n "${BASTION_NAME}" -l "${LOCATION}" \
  --vnet-name "${VNET_NAME}" \
  --public-ip-address "${BASTION_PIP_NAME}" \
  --sku Standard --enable-tunneling true
Bastion takes 5-10 minutes to provision (up to 30 minutes in some regions). Wait for it to complete before the next step.
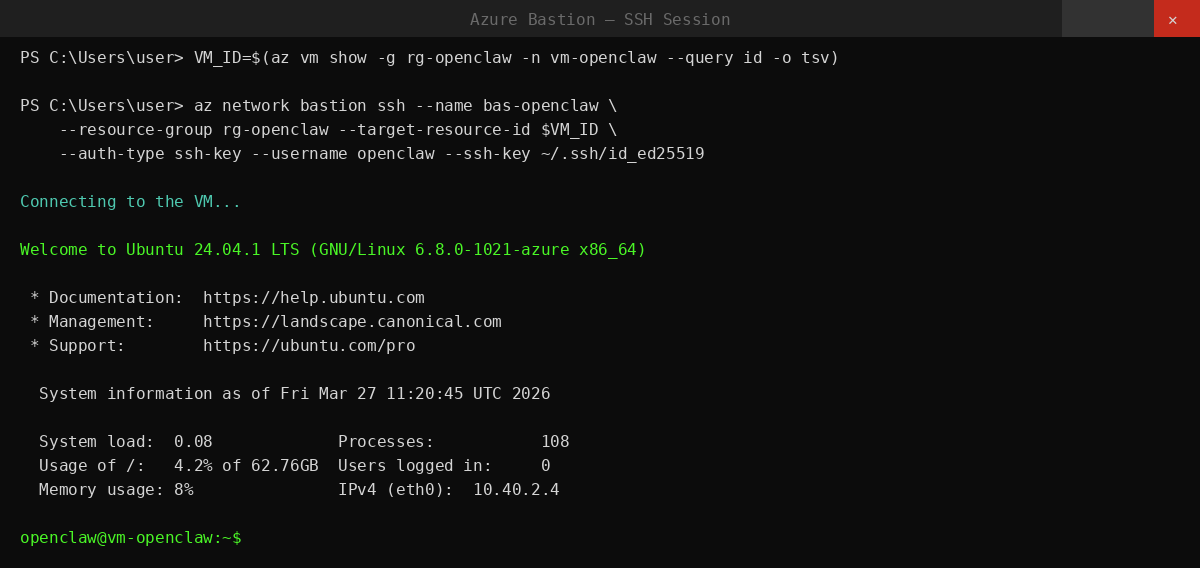
Step 10: SSH Into the VM via Azure Bastion
Once Bastion is ready, connect to the VM:
VM_ID="$(az vm show -g "${RG}" -n "${VM_NAME}" --query id -o tsv)"

az network bastion ssh \
  --name "${BASTION_NAME}" \
  --resource-group "${RG}" \
  --target-resource-id "${VM_ID}" \
  --auth-type ssh-key \
  --username "${ADMIN_USERNAME}" \
  --ssh-key ~/.ssh/id_ed25519
You are now inside the VM.
Step 11: Install OpenClaw
Run the OpenClaw installer inside the VM:
curl -fsSL https://openclaw.ai/install.sh | bashThe installer detects Ubuntu, installs Node.js if missing, installs OpenClaw, and launches the onboarding wizard. During onboarding, choose your AI provider and set up your messaging channel.
After onboarding, connect a messaging channel - Telegram, WhatsApp, Discord, Microsoft Teams, Slack, or any other supported app - to start chatting with your agent.
Step 12: Verify the Installation
Run these in the Bastion SSH session to confirm everything is working:
openclaw status
openclaw gateway status
If anything looks wrong:
openclaw doctor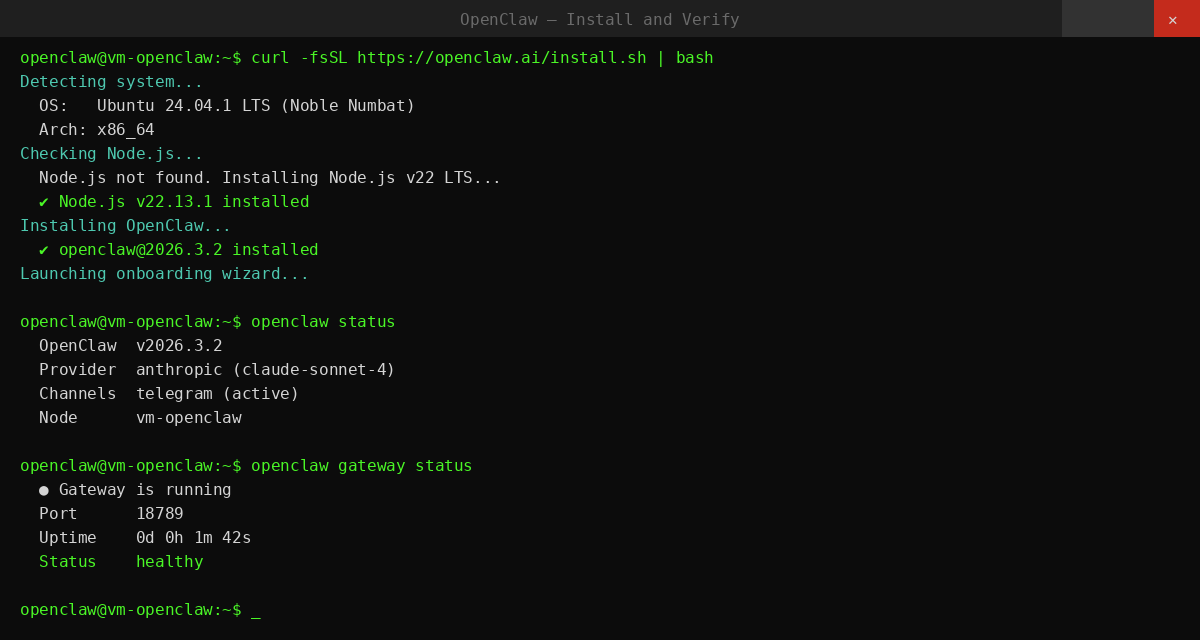
Cleanup
To delete everything created by this guide:
az group delete -n "${RG}" --yes --no-waitThis removes the VM, VNet, NSG, Bastion, public IP, and all associated resources.
Common Issues and Fix
| Issue | Fix |
|---|---|
| Azure CLI not found | Install Azure CLI - see Step 1 |
| Provider not registered | az provider register --namespace Microsoft.Compute |
| VM creation fails (quota) | az vm list-usage --location westus2 -o table |
| Bastion SSH fails | Wait 10-15 min after Bastion deploy - it needs time to fully provision |
| openclaw: command not found | Reload shell: source ~/.bashrc |
| OpenClaw not starting | openclaw gateway start |
| Gateway shows error | openclaw doctor |
| Agent not responding | openclaw status then openclaw channels status --probe |
If you prefer to avoid these setup issues entirely, you can deploy OpenClaw on Ampere.sh in 60 seconds. No manual configuration, no debugging, and no infrastructure management required.